July 13, 2017
Using React with Rails and Webpack

I first got started with React back in 2015, and my initial experience was pretty negative. I had no experience using Webpack or Babel, so setting up my local dev environment was an error-filled nightmare. It probably took a solid week before I was able to run the code samples in React’s getting started guide.
Luckily, it’s much easier to get up and running with React since the release of create-react-app, a Node package that hides away all the tedious configuration that was previously required. New React devs can start coding their first apps in mere minutes instead of days.
It’s also been difficult to integrate React and Webpack into a traditional Rails project, as Rails has its own built-in asset pipeline for managing front-end resources. But this is no longer the case - Webpack is now a first-class citizen in Rails 5.1, which means that using React with Rails is now easier than ever. Let’s take a look at how to configure Rails with Webpack and React.
Update Your System
First, make sure the following tools are up-to-date on your local development machine:
Create or Update Your Project
Get started by creating a new Rails project with the --webpack=react option:
rails new sampleapp --webpack=reactOr, if you’d like to add React to an existing Rails app, add gem 'webpacker' to your Gemfile, then run:
bundle install
rails webpacker:install
rails webpacker:install:react
You’ll notice a ton of packages being installed in your command window - these are all development tools required by Webpack and React. When the install process finishes, Webpack and React will be ready to use in your Rails app!
Start the Development Server
You’d typically use rails server to start a local Rails dev server to view your app in a web browser. When using Webpack, you’ll actually need to spin up two servers - one for Rails and one for the Webpack build process. This adds a bit of overhead, but in return you get nice features such as live code reloading in your browser as you make changes to your front-end code.
We’ll use Foreman to start both servers with a single command. First, install the Foreman gem:
gem install foremanNext, create a new file in your Rails app root named Procfile with this content:
web: bundle exec rails s
webpacker: ./bin/webpack-dev-server
After saving your Procfile, run the Foreman command in your project root directory:
foreman startForeman will run both the commands listed in your Procfile. Two local servers should start up: your Rails dev server at http://localhost:5000 and your Webpack dev server at http://localhost:8080 (check the output of the foreman start command to see if your dev servers are running on different port numbers).
You should now be able to open http://localhost:5000 in a web browser and see your Rails app.
Add a Sample Controller and View
If you created a brand new Rails app at the beginning of this exercise, go ahead and create a new controller and view:
rails generate controller Home indexThis will create a new HomeController with an index action, accessible at GET /home/index. Let’s simply make this the root route by editing /config/routes.rb:
Rails.application.routes.draw do
  root to: 'home#index'
end
Refresh your browser and you’ll see your home#index view.
Note: If you’re adding React to an existing Rails app, you can use any of your existing GET routes for the rest of this exercise.
Add a Pack Tag to Your Layout
You’ll notice a new directory in your Rails app named /app/javascript/ - any files in this folder will be compiled automatically by Webpack, and it’s where you’ll create your React components.
You’ll notice a sample file in /app/javascript/packs named application.js (if you created a brand new app, you’ll also see hello_react.jsx). Any JS files in your packs folder are referred to as “packs,” and they serve as the entry points for your front-end code. Make sure you have an application.js file with the following content:
console.log('Hello World from Webpacker');Important Note on JavaScript Folders
If you take a look in /app/assets/, you’ll notice that your app still contains the standard Rails javascripts folder, which also has a file named application.js. So why is your JavaScript now split between two separate folders?
The answer is due to the fact that we now have two build processes that compile our JavaScript code:
/app/assets/- Rails will compile any resources in this folder. JavaScript files in this folder can be included in your views with<%= javascript_include_tag %>./app/javascript/- Webpack will compile any resources in this folder. JavaScript files in this folder can be included in your views with<%= javascript_pack_tag %>.
Simply put, the scripts are kept in separate folders to avoid confusion and to prevent Rails and Webpack from stepping on each other’s toes.
By default, none of your packs are being rendered to your views. Open up /app/views/layouts/application.html.erb and add the following to the bottom of your <head> tag:
<%= javascript_pack_tag 'application' %>Open your web browser’s development console, then refresh your app. You should now see Hello World from Webpacker displayed in the console, which means that the Webpack bundler is working with Rails!
Just for fun, open up /app/javascript/packs/application.js and change the console.log() message to 'Ready for React!'. As soon as you save the file, your web browser window should automatically refresh, showing the updated message in your console. Our Webpack live reload server is working too!
Add a React Component
We’ve verified that Webpack is working with our console.log() message, so now let’s verify that React is also working by building a simple component.
Create a new folder under /app/javascript named components, then create a new file inside named SampleComponent.js. Add the following code to the file:
import React from 'react';

export default class SampleComponent extends React.Component {
  render() {
    return (
      <h1>Hi, I'm SampleComponent!</h1>
    );
  }
}
This component simply renders a heading tag with text, but note that the component name is exported so it can be imported by other JavaScript files.
Why place components in a separate folder? This is mainly for cleanliness - I recommend separating your React components from your packs based on these rules:
/app/javascript/components/- Place your components here./app/javascript/packs/- Place your DOM rendering scripts here. This folder should only contain scripts which will be rendered using<%= javascript_pack_tag %>.
Think of your packs as bridges between your Rails views and your React components. If you’re building a single-page application, you’ll likely only have a single pack, which handles the rendering of your components with something like React Router.
Now that you have a component, it’s time to render it to the DOM with your pack. Update /app/javascript/packs/application.js to the following:
import React from 'react';
import { render } from 'react-dom';
import SampleComponent from '../components/SampleComponent';

document.addEventListener('DOMContentLoaded', () => {
  const container = document.body.appendChild(document.createElement('div'));
  render(<SampleComponent/>, container);
});
All right! Your pack file is now importing the new SampleComponent as a module, waiting for the DOM to load, then rendering the component to a new <div> element at the bottom of the page. As soon as you saved application.js, your browser should have reloaded to show the component:
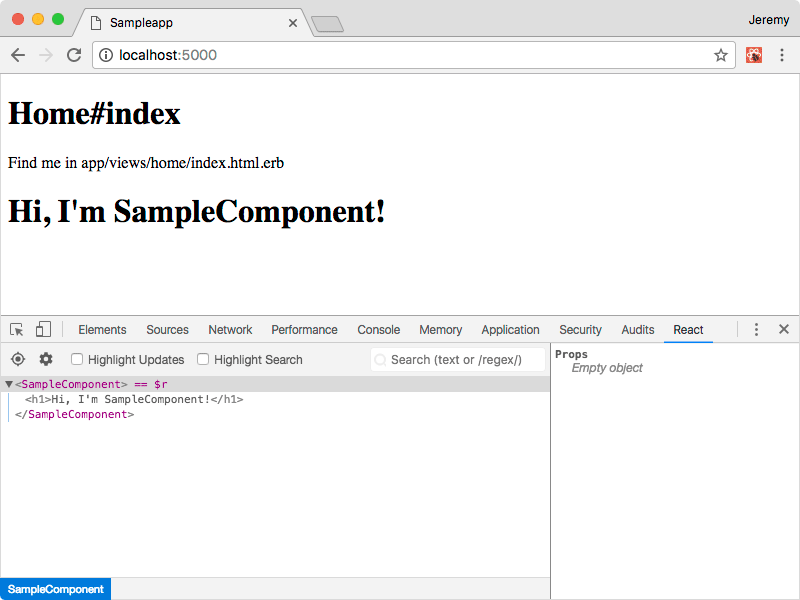
If you have React Developer Tools installed as a browser extension, you can also use it to inspect the React component.
Learn More about Rails and Webpacker
You can learn more about the Webpacker gem on GitHub: https://github.com/rails/webpacker